ESP32 LED Chaser (Running Light) Experiment
This article demonstrates how to build a classic LED chaser (running light) circuit with ESP32, including several implementation methods and code optimizations.
Introduction
This tutorial shows how to create a classic LED chaser (running light) using ESP32 and Arduino. You will learn the hardware wiring, program structure, and several ways to implement the effect, including a more concise version using arrays and loops.
Hardware Design
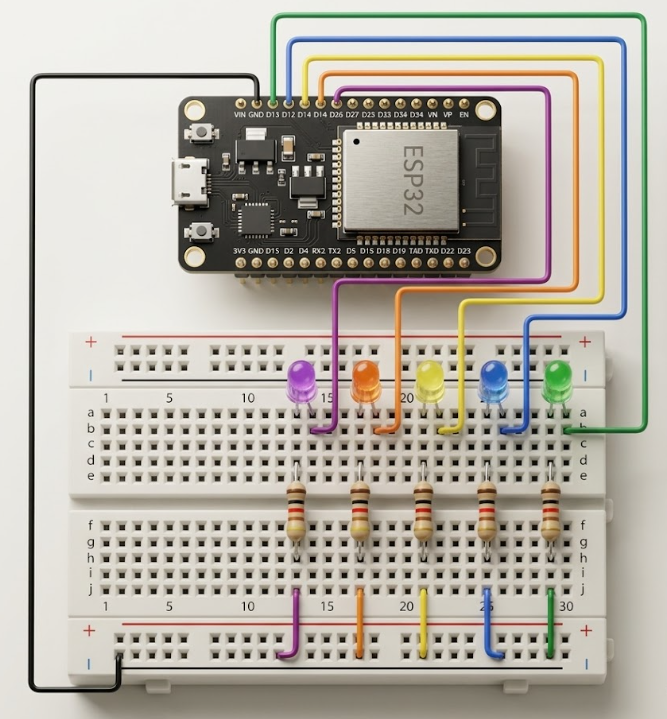
Bill of Materials (BOM):
| Item | Quantity |
|---|---|
| LED (through-hole) | 5 |
| 1kΩ resistor | 5 |
| Jumper wires | Several |
| Breadboard | 1 |
Each LED anode connects to a separate ESP32 GPIO pin via a 1kΩ resistor; all cathodes connect to GND.
Software Design
1. Basic LED Chaser
The simplest way is to use an array to store the GPIO pins and loop through them to turn each LED on and off in sequence.
// Define GPIO pins for LEDs
const int pin_list[] = {13, 12, 14, 27, 26};
const int size = sizeof(pin_list) / sizeof(pin_list[0]);

void setup() {
  for (int i = 0; i < size; i++) {
    pinMode(pin_list[i], OUTPUT);
    digitalWrite(pin_list[i], LOW); // Ensure all LEDs are off at start
  }
}

void loop() {
  for (int i = 0; i < size; i++) {
    digitalWrite(pin_list[i], HIGH); // Turn on current LED
    delay(80);
    digitalWrite(pin_list[i], LOW);  // Turn off current LED
  }
}
Alternative (more concise):
You can use a single variable to track the current LED and update only two pins per step:
const int pin_list[] = {13, 12, 14, 27, 26};
const int size = sizeof(pin_list) / sizeof(pin_list[0]);
int current = 0;

void setup() {
  for (int i = 0; i < size; i++) {
    pinMode(pin_list[i], OUTPUT);
    digitalWrite(pin_list[i], LOW);
  }
}

void loop() {
  digitalWrite(pin_list[current], HIGH);
  digitalWrite(pin_list[(current + size - 1) % size], LOW);
  delay(120);
  current = (current + 1) % size;
}
2. Bidirectional (Ping-Pong) Chaser
To make the LEDs light up back and forth, use a direction variable:
const int pin_list[] = {13, 12, 14, 27, 26};
const int size = sizeof(pin_list) / sizeof(pin_list[0]);
int current = 0;
int dir = 1;

void setup() {
  for (int i = 0; i < size; i++) {
    pinMode(pin_list[i], OUTPUT);
    digitalWrite(pin_list[i], LOW);
  }
}

void loop() {
  digitalWrite(pin_list[current], HIGH);
  delay(100);
  digitalWrite(pin_list[current], LOW);
  current += dir;
  if (current == size - 1 || current == 0) dir = -dir;
}
3. Moving Light (Single LED Moves)
To create a moving light effect where only one LED is on at a time:
const int pin_list[] = {13, 12, 14, 27, 26};
const int size = sizeof(pin_list) / sizeof(pin_list[0]);

void setup() {
  for (int i = 0; i < size; i++) {
    pinMode(pin_list[i], OUTPUT);
    digitalWrite(pin_list[i], LOW);
  }
}

void loop() {
  for (int i = 0; i < size; i++) {
    for (int j = 0; j < size; j++) {
      digitalWrite(pin_list[j], j == i ? HIGH : LOW);
    }
    delay(180);
  }
}
4. Symmetrical (Center-Out) Chaser
This effect lights up LEDs from the center outwards and then back inwards, creating a symmetrical running light:
const int pin_list[] = {13, 12, 14, 27, 26};
const int size = sizeof(pin_list) / sizeof(pin_list[0]);

void setup() {
  for (int i = 0; i < size; i++) {
    pinMode(pin_list[i], OUTPUT);
    digitalWrite(pin_list[i], LOW);
  }
}

void loop() {
  int mid = size / 2;
  // Center out
  for (int offset = 0; offset <= mid; offset++) {
    for (int i = 0; i < size; i++) digitalWrite(pin_list[i], LOW);
    digitalWrite(pin_list[mid - offset], HIGH);
    digitalWrite(pin_list[mid + offset], HIGH);
    delay(180);
  }
  // Out to center
  for (int offset = mid - 1; offset >= 0; offset--) {
    for (int i = 0; i < size; i++) digitalWrite(pin_list[i], LOW);
    digitalWrite(pin_list[mid - offset], HIGH);
    digitalWrite(pin_list[mid + offset], HIGH);
    delay(180);
  }
}
5. Random LED Chaser
This effect randomly lights up one LED at a time, creating a dynamic and unpredictable running light:
#include <Arduino.h>
const int pin_list[] = {13, 12, 14, 27, 26};
const int size = sizeof(pin_list) / sizeof(pin_list[0]);
int last = -1;

void setup() {
  for (int i = 0; i < size; i++) {
    pinMode(pin_list[i], OUTPUT);
    digitalWrite(pin_list[i], LOW);
  }
  randomSeed(analogRead(0));
}

void loop() {
  int idx = random(size);
  // Avoid lighting the same LED twice in a row
  while (idx == last) idx = random(size);
  for (int i = 0; i < size; i++) digitalWrite(pin_list[i], LOW);
  digitalWrite(pin_list[idx], HIGH);
  last = idx;
  delay(200);
}
References
Share this article
Comments
0Please sign in to post a comment.
No comments yet.