ESP32 Arduino Button Input: Practical Guide and Debouncing
This article explains how to use a button as a digital input on ESP32 with Arduino, including hardware wiring, debouncing techniques, and a practical example to control an LED.
Introduction: Button Input on ESP32 with Arduino
This tutorial demonstrates how to use a button as a digital input on the ESP32 using Arduino. You will learn the hardware wiring, the importance of debouncing, and how to use a button to control an LED. This guide helps you avoid common pitfalls and ensures reliable button detection in your projects.
Principle: How Button Inputs Work
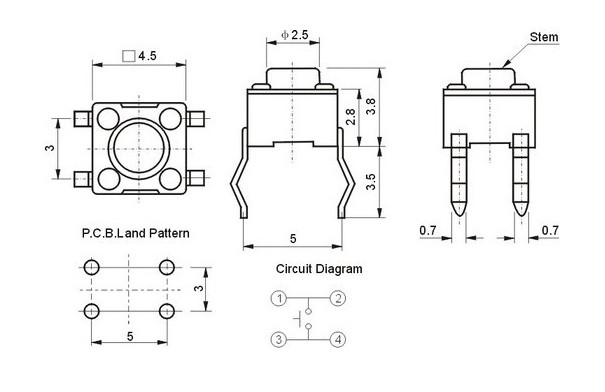
A button is a simple electronic switch. When pressed, it connects two contacts, closing the circuit. When released, the circuit opens. Most buttons have four pins; diagonally opposite pins are typically connected internally. Always check with a multimeter or use diagonal connections for reliability.
Debouncing: Ensuring Reliable Button Presses
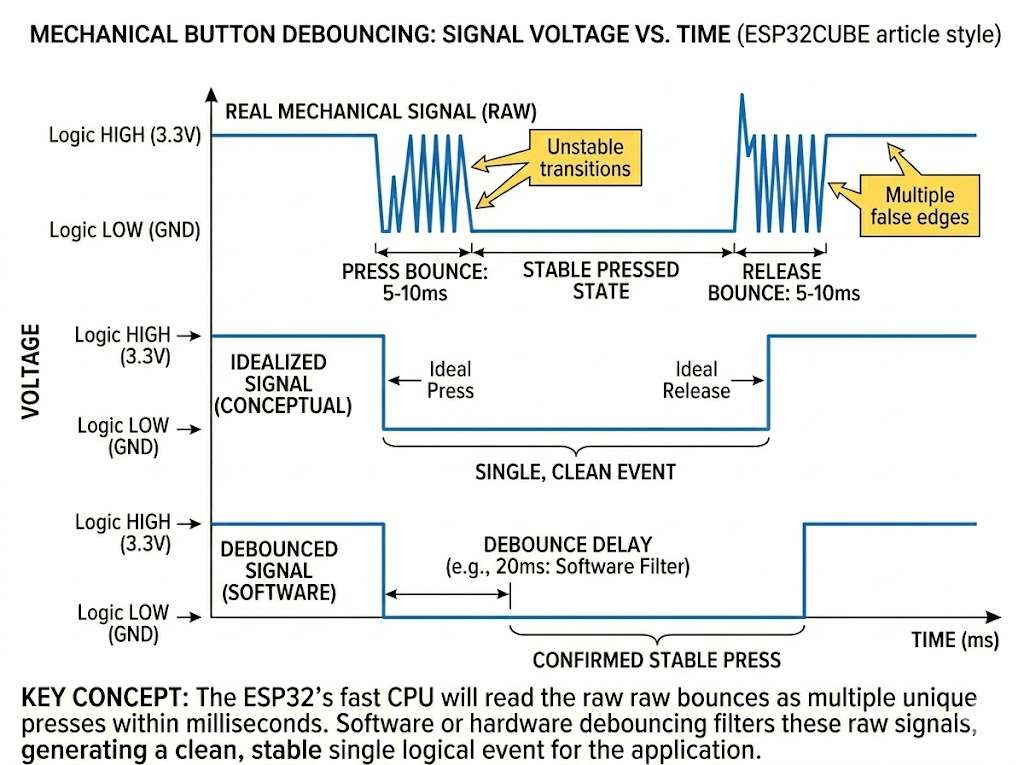
Mechanical buttons generate noise ("bouncing") when pressed or released, causing multiple rapid transitions. For microcontrollers, this can result in multiple false triggers. Debouncing is essential for reliable input detection.
- Hardware Debounce: Use an RC circuit or flip-flop for strict requirements and few buttons.
- Software Debounce: Add a short delay (e.g., 10ms) after detecting a press, then check again. If still pressed, treat as a valid press. This is common for most Arduino projects.
Hardware Circuit Design
To control an LED with a button:
BOM:
- 1x LED (through-hole)
- 1x 1kΩ resistor
- 1x 4-pin button
- Jumper wires
- Breadboard
Wiring:
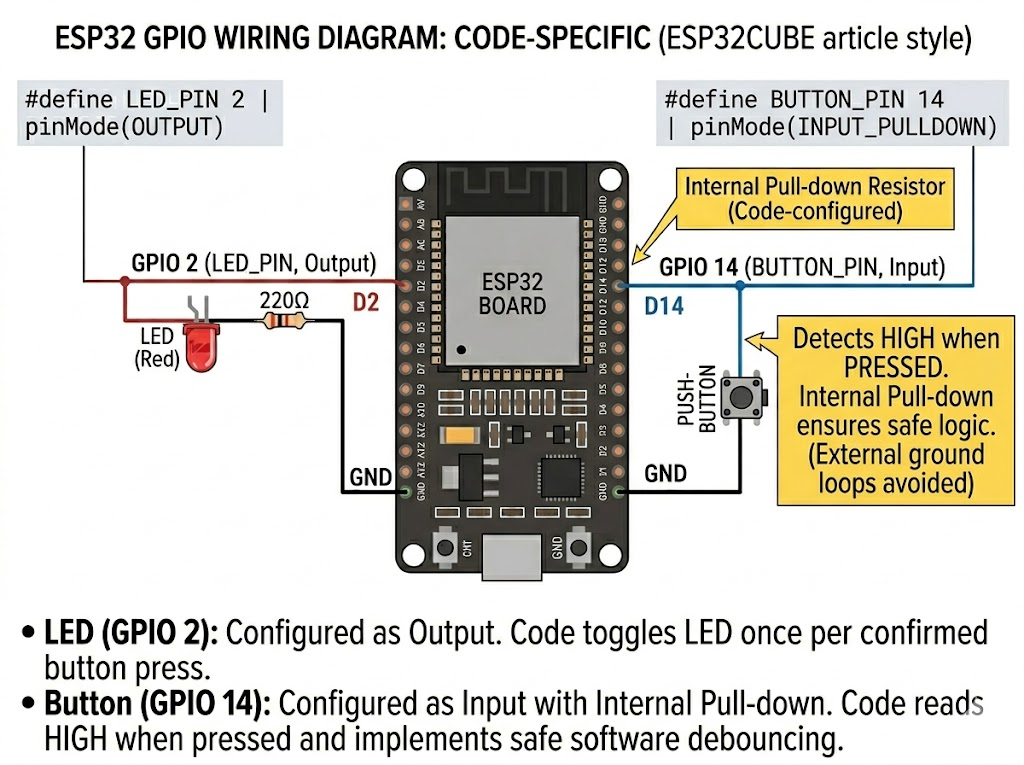
- One side of the button to 3.3V
- The other side to GPIO14 (D14)
- LED anode to GPIO2 (D2), cathode to GND
Software Design: Reading Button Input and Debouncing
Configure the button pin as input with pull-down resistor. Use digitalRead to check the button state. Debounce by adding a delay and rechecking the state.
Example Code (with Macros)
#define LED_PIN     2
#define BUTTON_PIN  14

bool led_state = false;
bool button_pressed = false;

void setup() {
  pinMode(LED_PIN, OUTPUT);
  pinMode(BUTTON_PIN, INPUT_PULLDOWN);
}

void loop() {
  // Check if button is pressed
  if (digitalRead(BUTTON_PIN) && !button_pressed) {
    delay(10); // Debounce
    if (digitalRead(BUTTON_PIN)) {
      led_state = !led_state;
      digitalWrite(LED_PIN, led_state);
      button_pressed = true;
    }
  }
  // Reset state when button is released
  if (!digitalRead(BUTTON_PIN) && button_pressed) {
    button_pressed = false;
  }
}
- Debounce Delay: 10ms (adjustable)
Practical Tips and Notes
- Always use pull-up or pull-down resistors to avoid floating inputs.
- For multiple buttons or complex systems, consider using timer interrupts for debouncing.
- Macros (
#define) improve code readability and maintainability. - Test your circuit with a multimeter before powering up.
Share this article
Comments
0Please sign in to post a comment.
No comments yet.